
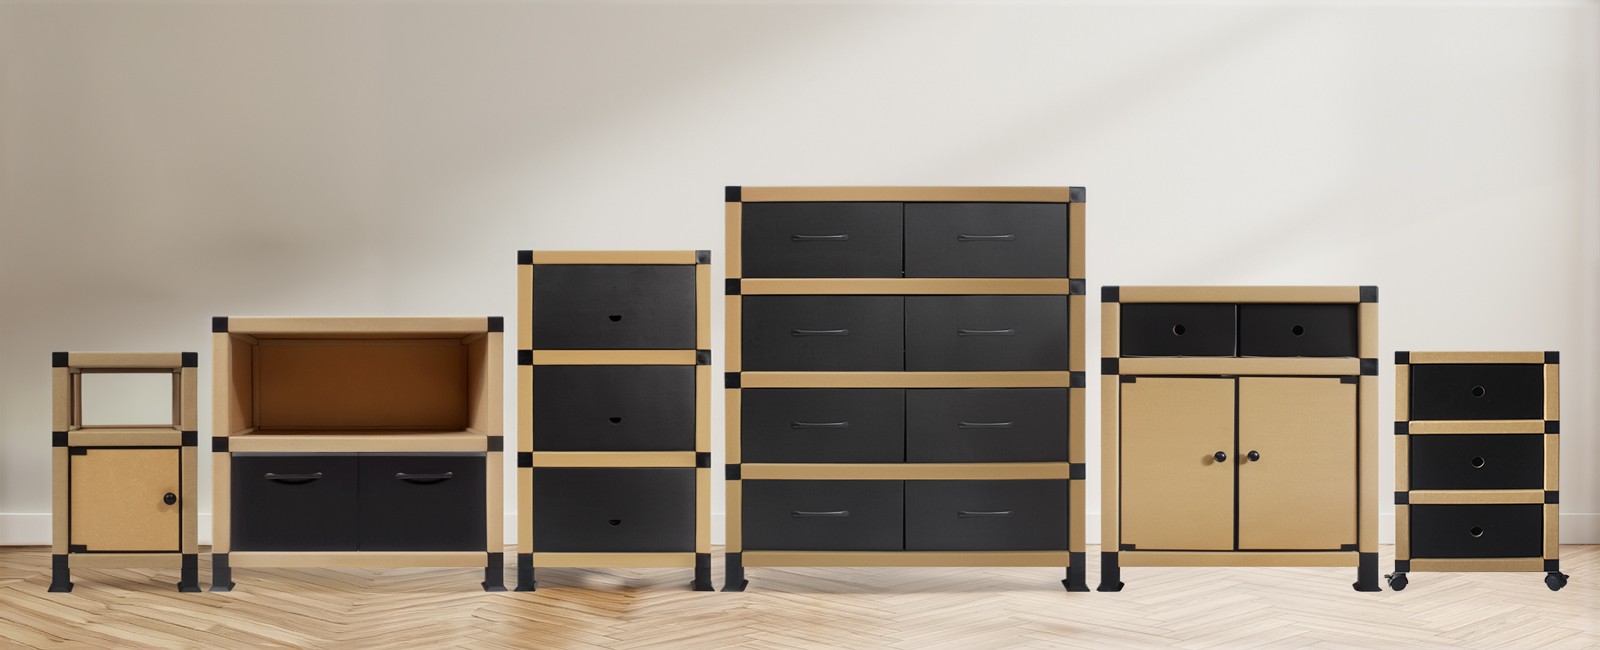
A detachable paper media console is a living-room storage unit built from high-strength paper tubes, reinforced paper panels, and multi-prong polypropylene (PP) connectors. Unlike conventional flat-pack furniture that demands screwdrivers, Allen wrenches, and hours of patience, this type of console snaps together using a modular connector system — no tools required. Whether you are furnishing a rental apartment, setting up a dorm room, or creating a temporary display space, the assembly process is designed to be intuitive and fast. This guide walks you through every stage: from unboxing and identifying components, through step-by-step assembly, to disassembly, care, and troubleshooting.
The secret behind tool-free assembly furniture lies in three engineered components working together. High-strength kraft paper tubes serve as the vertical supports — each one rolled from multiple layers of paper to achieve a load-bearing capacity that rivals wooden dowels of the same diameter. Reinforced paper panels form the horizontal surfaces, treated with a water- and stain-resistant coating so that everyday spills bead up rather than soak in. Multi-prong PP connectors tie everything together: these small polypropylene joints come in 3-way and 4-way configurations and use a snap-fit design. You push a panel edge or tube end into a slot, and it clicks into place — no glue, no screws, no hardware.
MINHOU UNIMAX, the manufacturer behind this system, has been refining paper-furniture structures since 2009 and holds patents on its connector designs. The company is a member of both FSC (Forest Stewardship Council) and BSCI, and its products have passed tests covering formaldehyde, load capacity, and heavy-metal content. These details matter because they explain why the assembly process can be so simple: the engineering has already been done at the component level.
Before starting assembly, lay everything out and confirm the parts. A typical paper media console ships flat-packed and contains four types of components:
Reinforced Paper Panels
These form the top, bottom, sides, and shelves. Each panel has pre-cut holes along the edges where connectors insert. Panels are labeled with small icons or numbers (such as A1, B2) to guide orientation.
High-Strength Paper Tubes
Vertical supports that connect panels and give the console its height. Made from tightly rolled kraft paper, these tubes distribute weight evenly and form the backbone of the load-bearing structure.
Multi-Prong PP Connectors
The heart of the tool-free system. Available in 3-way (corner) and 4-way (cross) configurations. Each connector has precision-sized slots that grip panels and tubes through friction and snap-fit geometry.
Plastic Foot Covers
Small cups that snap onto the bottom of the lowest tubes or connectors. They lift the console slightly off the floor, protecting the paper from moisture and making the unit easier to slide when repositioning.
Before You Start
Clear a flat surface large enough to lay out all the panels — your living-room floor works well. Count the panels, tubes, and connectors against the packing list. If anything is missing or damaged, contact the supplier before proceeding. Keep the visual instruction sheet nearby; most paper furniture uses diagram-based guides rather than text-heavy manuals.
The following steps describe a standard assembly for a console with a base, two side panels, one middle shelf, and a top panel. If your specific model includes doors or a back panel, those go on last. The entire process typically takes under ten minutes.
Snap a plastic foot cover onto the bottom end of each vertical paper tube, or onto the bottom slot of each corner connector — depending on your model's design. Press firmly until each cover clicks into place. This step takes seconds and ensures the finished console sits level on the floor from the start.
Take four multi-prong PP connectors and insert them into the pre-cut holes along one edge of the bottom panel — one at each corner. Push each connector in until you feel or hear a click. The connectors should sit flush with the panel surface. If a connector resists, check that you are inserting it in the correct orientation: 3-way connectors have a defined corner direction, while 4-way connectors are symmetrical.
Take a paper tube and slide one end into the upward-facing slot of a connector on the bottom panel. Press down firmly until it locks. Repeat for each corner. You now have four vertical tubes standing upright from the base, forming the skeleton of the console.
If your console includes a middle shelf, take that panel and align its four corner holes with the exposed slots on the connectors already attached to the vertical tubes. Slide the panel down over the tubes, guiding each corner onto a connector slot. Press gently on each corner until it clicks. The shelf should sit level — if it tilts, one corner is not fully seated.
Place the top panel over the four vertical tubes, aligning its pre-cut holes with the remaining connector slots. Push down on each corner until the snap-fit lock engages. At this point, the frame should be rigid — you can lift it by one corner without wobble.
Some models in the living room cabinet range come with optional back panels or hinged doors. Back panels slide into grooves along the rear edges of the side panels. Doors hook onto pre-installed connector pins on the front edges. Neither step requires tools.
Walk around the console and press down on each connector to confirm it is fully seated. Give the unit a gentle push — it should stand firm. If any joint feels loose, pull the component out and reinsert it, making sure the panel or tube is aligned with the slot before pressing. A properly assembled console will not wobble.
Pro Tip
Press straight down when inserting connectors. Angled pressure can bend a panel edge and prevent a clean fit. If a connector feels stubborn, remove it, realign, and try again rather than forcing it.
Even with a tool-free system, a few issues can arise. Here are the most common ones and how to resolve them quickly:
| Issue | Likely Cause | Solution |
|---|---|---|
| Panel inserted upside down | Pre-cut holes look similar on both sides | Check the icon labels or numbering on each panel before inserting; remove and reposition if needed |
| Connector not fully seated | Pressing too gently or at an angle | Remove the connector, realign it straight, and press down firmly until you hear a click |
| Shelf sitting at a tilt | Not all four corners aligned with connectors | Lift the shelf, realign all four corners simultaneously, and slide down evenly |
| Console wobbles after assembly | Foot covers missing or floor uneven | Confirm all foot covers are installed; place a shim under the shortest leg if the floor is uneven |
| Tube slides out under pressure | Connector slot not engaged with the tube end | Pull the tube out, check that the connector is correctly seated in the panel first, then reinsert the tube |
One of the defining advantages of detachable eco furniture is that it comes apart as easily as it goes together. The snap-fit connectors are engineered for repeated assembly and disassembly, so you can take the console apart, move it, and rebuild it without degrading the joints. To disassemble:
The components flat-pack back into a compact box, making the console practical for renters, students, or anyone who moves frequently. Reassembly follows the same steps in reverse order.
Paper furniture is engineered for real-world use, but it has defined load limits. According to the manufacturer's published specifications, selected structures can support an adult weighing up to 80 kg, and shelving units can carry a total load of 50 kg. For a media console, this means it can comfortably hold a television, a gaming console, a streaming device, and a row of books — but it is not designed for someone to stand or sit on.
The weight advantage works both ways: the console itself weighs roughly 20–30% as much as a conventional unit of the same size. That makes it easy to carry up stairs, reposition during cleaning, and load into a vehicle for a move.
Paper furniture performs best in dry indoor environments with controlled humidity. To keep your console in good condition over its service life:
Under suitable conditions, paper furniture typically lasts 1–5 years, and with careful use it can serve longer. It is best suited to light-use, storage, decorative, and transitional applications rather than permanent heavy-load core furniture.
Beyond the assembly convenience, a paper media console offers practical benefits that conventional furniture struggles to match. The materials are recyclable and renewable — when the console eventually reaches the end of its service life, the panels and tubes can go into standard paper recycling streams rather than a landfill. The flat-pack design reduces shipping volume, which lowers transportation emissions and keeps delivery costs down.
The modular nature of the system also means flexibility. Need a different configuration next year? Disassemble and reconfigure the panels. Moving to a new apartment? Flat-pack everything into one box and take it with you. Setting up a temporary exhibition or pop-up display? Build a sturdy unit in minutes and break it down just as fast when the event ends.
For those exploring the broader range, the same connector system extends beyond media consoles to bedside tables, bedroom wardrobes, bookcases, home organizers, children's desk-and-seating sets, and even pet houses — all sharing the same tool-free, snap-together assembly philosophy.
Assembling a detachable paper media console without tools comes down to seven straightforward steps: attach the foot covers, build the base frame with connectors, insert the vertical tubes, add the middle shelf, cap it with the top panel, install any doors or back panels, and do a final stability check. The snap-fit connector system eliminates the need for screwdrivers, Allen wrenches, or glue. When it is time to move or store the unit, the same process reverses in minutes. The result is a sturdy, lightweight, and fully recyclable piece of furniture that adapts to your space and your lifestyle — no toolbox required.
